This week’s template is a little less beautiful from a graphic point of view. It has been a very busy week at work, but I still wanted to publish something. It’s an interesting prototype, because it shows some potential of Construct 3 and, moreover, it’s my first working test of something I want to develop in the coming months.
But what is it about? A simple program to access Microsoft Access databases, see the tables contained in the database and analyze their structure. It does nothing more but I needed to test some things together before starting to work on a more complex project than usual.
I wanted to check:
- the ability to read files on local disk in a simple and intuitive way
- the ability to read MDB files via JavaScript
- the ability to create a single EXE file to install the program
- the ability to automatically update an application with each new release published on GitHub
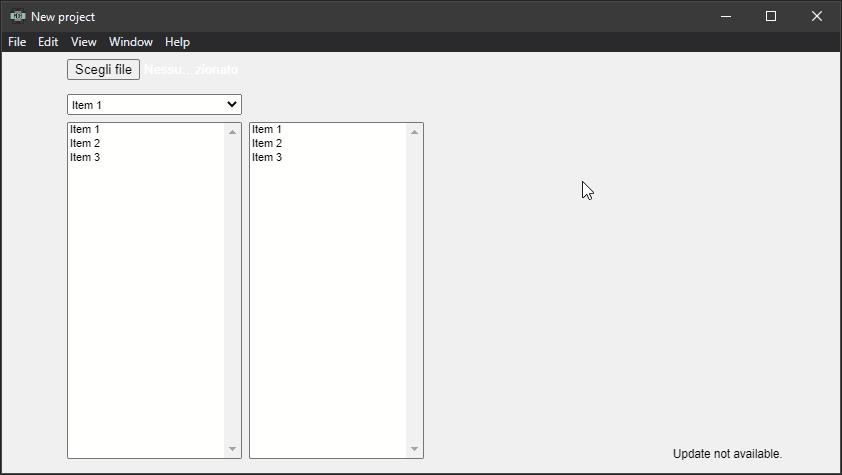
Of course I knew that it is possible to do this. I didn’t know how, and what the limits I would encounter would be. This is the result:
The initial settings
I chose to use Electron and TypeScript to make it easier to create an offline app. I have chosen to rely on node-adodb to manage the query of the MDB files. Finally I decided to use Construct 3 for the graphical interface.
After deciding this I created the basic structure of the project. So, from the command line I started to initialize and download the various packages:
npm init
npm i -D electron@latest
npm install typescript --save-dev
npm install electron-builder --save-dev
npm i electron-updater
npm i node-adodb
About node-adodb there is an important note:
The library need system support
Microsoft.Jet.OLEDB.4.0orMicrosoft.ACE.OLEDB.12.0,Windows XP SP2above supportMicrosoft.Jet.OLEDB.4.0by default, Others need to install support!Recommended use
Microsoft.ACE.OLEDB.12.0, download: Microsoft.ACE.OLEDB.12.0
The folders structure
After downloading the packages, I established how to organize the various project folders:
- src: the typescript files of the program
- src_c3: Construct 3 files
- dist: JavaScript files and exported C3 files
- out: the destination folder where to save the installation file
package.json
The next step was to configure the package.json to make it possible to compile the TypeScript files, test the project and publish it on GitHub.
{
  "name": "access-c3",
  "productName": "Access C3",
  "version": "0.0.1",
  "main": "dist/index.js",
}
I start with the basic information. Repository name and program entry point. Since all compiled TS files will end up in the dist directory the entry point is in the directory.
The version number and the productName are important and should not be underestimated. The first because it will allow Electron to understand the version number of the program installed and possibly install a program update. The name of the product because it is the name that the program will have when it is installed on a computer.
{
  "scripts": {
    "start": "npm run compile && electron .",
    "compile": "tsc",
    "build-installer": "electron-builder build --win --publish never",
    "publish": "electron-builder build --win --publish always",
  }
}
The content of scripts makes it easy to launch the application (when I have to test it) and post the final file to GitHub
The command npm run start allows you to compile TypeScript files and launch the program.
npm run build-installer creates the installation file (but not publish it on GitHub)
npm run publish creates the program installation file and upload it directly to the GitHub repository.
{
  "build": {
    "appId": "access-c3",
    "directories": {
      "output": "out"
    },
    "win": {
      "target": [
        "nsis"
      ],
      "icon": "icon.ico",
      "requestedExecutionLevel": "requireAdministrator"
    },
    "nsis": {
      "installerIcon": "icon.ico",
      "uninstallerIcon": "icon.ico",
      "uninstallDisplayName": "Access C3",
      "license": "license.txt",
      "oneClick": false,
      "allowToChangeInstallationDirectory": true
    }
  }
}
Detailed explanations on the various configuration options can be found on electron.build. I chose to use nsis as a target because it is the only one that allows a complete installation without having to have a computer connected to the internet.
{
  "build": {
    "publish": [
      {
        "provider": "github",
        "owner": "el3um4s",
        "repo": "access-c3"
      }
    ]
  }
}
This piece of the configuration file is used to manage the publication on GitHub and configure automatic updates
{
  "build": {
    "extraResources": [
      {
        "from": "./node_modules/node-adodb/lib/adodb.js",
        "to": "adodb.js"
      }
    ]
  }
}
Finally this last option is for using node-adodb from Electron.
tsconfig.json
The second important file for configuring the project is tsconfig.json. Here are instructions for compiling TypeScript files into JavaScript files:
"compilerOptions": {
      "target": "ES2020",
      "module": "commonjs",
      "outDir": "./dist",
      "rootDir": "./src",
      "strict": true,
      "moduleResolution": "node",
      "esModuleInterop": true,
      "skipLibCheck": true,
      "forceConsistentCasingInFileNames": true
    },
    "exclude": [
      "node_modules",
      "public",
      "out/**",
      "typings/browser/**"
  ]
}
I recommend visiting aka.ms/tsconfig.json for details of the various options.
TypeScript files
I used 3 TypeScript files:
- index.ts
- connection.ts
- listTypeFieldEnum.ts
I’ll talk about the last two, if anyone cares, in another post. They are used to manage the connection to the databases and to send the result to Construct 3. For the moment I focus on index.ts.
First I import the modules that will be needed in the project:
import { app, BrowserWindow, ipcMain } from 'electron';
import { autoUpdater } from "electron-updater"
import * as path from 'path';
import * as Connection from './connection';
import ADODB from 'node-adodb';
Then I set the auto updater to check every 4 hours:
(async () => {
		const FOUR_HOURS = 1000 * 60 * 60 * 4;
		setInterval(async () => {
			await autoUpdater.checkForUpdates();
		}, FOUR_HOURS);

		await autoUpdater.checkForUpdates();
})();
If an update is found, Electron downloads and installs it automatically. After that I create the window for the program:
const createWindow = () => {
  mainWindow = new BrowserWindow({
      width: 854,
      height: 480,
      webPreferences: {
          nodeIntegration: true,
          contextIsolation: false,
          enableRemoteModule: true
      }
  });
  mainWindow.loadURL(path.join(__dirname, 'www', 'index.html'));
  mainWindow.webContents.openDevTools();
};

app.on('ready', () => {
    app.name = 'Access C3';
    createWindow();
});

app.on('window-all-closed', () => {
    if (process.platform !== 'darwin') {
      app.quit();
    }
});
Then it comes to manage the sending of data to and from Construct 3. To do this it is very simple to use:
ipcMain.on('list-tables', async (event, message) => {
    const positionDB = message.path;
    const connection = Connection.open(positionDB);
    const schema = await Connection.getListTables(connection);
    event.reply('list-tables', schema);
});

ipcMain.on('schema-table', async (event, message) => {
    const positionDB = message.path;
    const tableName = message.tableName;
    const connection = Connection.open(positionDB);
    const schema = await Connection.getSchemaTable(connection,tableName);
    event.reply('schema-table', schema);
});
Instead, to make the search and download of program update files evident, it is advisable to use:
function sendStatusToWindow(text: string) {
    console.log(text);
    mainWindow.webContents.send('message', text);
}

autoUpdater.on('checking-for-update', () => {
    sendStatusToWindow('Checking for update...');
})
autoUpdater.on('update-available', (info) => {
    sendStatusToWindow('Update available.');
})
autoUpdater.on('update-not-available', (info) => {
    sendStatusToWindow('Update not available.');
})
autoUpdater.on('error', (err) => {
    sendStatusToWindow('Error in auto-updater. ' + err);
})
autoUpdater.on('download-progress', (progressObj) => {
    let log_message = "Download speed: " + progressObj.bytesPerSecond;
    log_message = log_message + ' - Downloaded ' + progressObj.percent + '%';
    log_message = log_message + ' (' + progressObj.transferred + "/" + progressObj.total + ')';
    sendStatusToWindow(log_message);
})
autoUpdater.on('update-downloaded', (info) => {
    sendStatusToWindow('Update downloaded');
});
Construct 3
For the details of the Construct 3 JavaScript code, I invite you to consult the project (access-c3.c3p). In summary, I have added a listener to the FileChooser plugin so that I can get the hard drive location of the database and use ipcRenderer.send("list-tables", { name, path }); to get the list of tables.
function buttonChooseDatabase_EventListener() {
	const chooseDatabase = document.getElementById("choose-database");
	chooseDatabase.addEventListener("change", handleFiles, false);
}

function handleFiles() {
    const fileList = this.files;
    if (fileList) {
        const file = fileList[0];
        console.log(file);
        const name = file.name;
        const path = file.path;
		ElectronStorage.pathDatabase = path;
		ipcRenderer.send("list-tables", { name, path });
    }
}
When Electron replies with the list of tables I use
ipcRenderer.on('list-tables', async (event, arg) => {
	ElectronStorage.listTables = arg;
	ElectronStorage.listTablesType = new Set();

	g_runtime.callFunction("ListTables_Clear");
	g_runtime.callFunction("ListTables_Filter_Clear");

	ElectronStorage.listTables.forEach(table => {
		g_runtime.callFunction("ListTables_Add", table.TABLE_NAME);
		ElectronStorage.listTablesType.add(table.TABLE_TYPE);
	});

	g_runtime.callFunction("ListTables_Filter_Add", "ALL");
	ElectronStorage.listTablesType.forEach(tableType => {
		g_runtime.callFunction("ListTables_Filter_Add", tableType);
	});
});
This allows me to display the names of the tables on the screen.
That’s all for the moment. If there are any questions or special requests I will write a second part of this article. But my goal, to test the feasibility of such a program, has been achieved. I think I’m experimenting on this project again but I don’t know yet whether to continue using C3 as a GUI. I’ll have to do some more tests.
However, I remember that the code of this project is available on GitHub:


